

ビルド不要のVueをAIコーディングで使うと便利
Tag:Web
Vue Advent Calendar 2025 3日目の記事です。
私は時々、必要になったツールなどをAIに作ってもらうのですが、その時は「1ファイルのHTML」として出力してもらうようにしています。
ビルドが不要ですし、保存やサーバーへのアップロードも1ファイルで完結するので楽だからです。
Vanillaで書くと
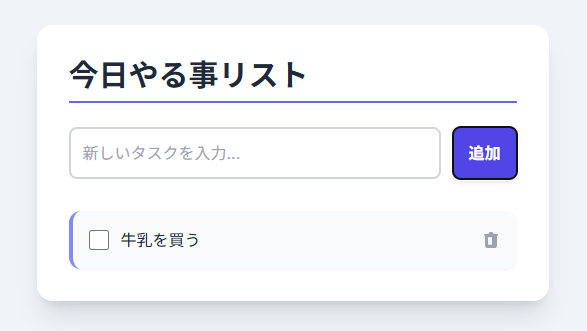
例としてシンプルなToDoリストを作ってみます。
Geminiの”高速モード”(gemini-flash-latest?)に下記のプロンプトで作ってもらいました。
シンプルなtodoリストをhtml1ファイルで作って。firebaseは使わない。
※なぜか毎回、Firebaseによるユーザー管理機能を入れようとするので、その対策を入れています。
下記のようなツールが作成されました。
コードを見る
|
1 2 3 4 5 6 7 8 9 10 11 12 13 14 15 16 17 18 19 20 21 22 23 24 25 26 27 28 29 30 31 32 33 34 35 36 37 38 39 40 41 42 43 44 45 46 47 48 49 50 51 52 53 54 55 56 57 58 59 60 61 62 63 64 65 66 67 68 69 70 71 72 73 74 75 76 77 78 79 80 81 82 83 84 85 86 87 88 89 90 91 92 93 94 95 96 97 98 99 100 101 102 103 104 105 106 107 108 109 110 111 112 113 114 115 116 117 118 119 120 121 122 123 124 125 126 127 128 129 130 131 132 133 134 135 136 137 138 139 140 141 142 143 144 145 146 147 148 149 150 151 152 153 154 155 156 157 158 159 160 161 162 163 164 165 166 167 168 169 170 171 172 173 174 175 176 177 178 179 180 181 182 183 184 185 186 187 188 189 190 191 192 193 194 195 196 197 198 199 200 201 |
<!DOCTYPE html> <html lang="ja"> <head> <meta charset="UTF-8"> <meta name="viewport" content="width=device-width, initial-scale=1.0"> <title>シンプルなToDoリスト</title> <!-- Tailwind CSS CDNを読み込み --> <script src="https://cdn.tailwindcss.com"></script> <!-- Interフォントを使用 --> <link href="https://fonts.googleapis.com/css2?family=Inter:wght@400;600;700&display=swap" rel="stylesheet"> <style> /* デフォルトフォントとしてInterを設定 */ body { font-family: 'Inter', sans-serif; background-color: #f0f4f8; /* ライトブルーの背景 */ } </style> </head> <body class="min-h-screen p-4 sm:p-8 flex items-start justify-center"> <!-- メインコンテナ --> <div id="app" class="w-full max-w-lg bg-white shadow-xl rounded-2xl p-6 sm:p-8"> <h1 class="text-3xl font-bold text-gray-800 mb-6 border-b-2 border-indigo-500 pb-2"> 今日やる事リスト </h1> <!-- タスク追加フォーム --> <div class="flex space-x-3 mb-8"> <input type="text" id="taskInput" placeholder="新しいタスクを入力..." class="flex-grow p-3 border-2 border-gray-300 rounded-lg focus:outline-none focus:ring-2 focus:ring-indigo-500 transition duration-150 text-gray-700" maxlength="100"> <button id="addTaskButton" class="bg-indigo-600 hover:bg-indigo-700 text-white font-semibold py-3 px-4 rounded-lg shadow-md transition duration-150 ease-in-out transform hover:scale-[1.02] active:scale-[0.98]"> 追加 </button> </div> <!-- ToDoリストコンテナ --> <div id="todoList" class="space-y-3"> <!-- タスクはここに動的に追加されます --> <p id="emptyMessage" class="text-center text-gray-500 italic">タスクがありません。追加してください!</p> </div> </div> <script> // DOM要素の取得 const taskInput = document.getElementById('taskInput'); const addTaskButton = document.getElementById('addTaskButton'); const todoList = document.getElementById('todoList'); const emptyMessage = document.getElementById('emptyMessage'); // ToDoリストの配列。最初は空にする。 let tasks = JSON.parse(localStorage.getItem('todoTasks')) || []; // localStorageにタスクを保存する関数 const saveTasks = () => { localStorage.setItem('todoTasks', JSON.stringify(tasks)); renderTasks(); }; // タスクをレンダリング(表示)する関数 const renderTasks = () => { // リストコンテナをクリア todoList.innerHTML = ''; // メッセージの表示/非表示を切り替え emptyMessage.style.display = tasks.length === 0 ? 'block' : 'none'; tasks.forEach((task, index) => { // li要素(タスクアイテム)を作成 const listItem = document.createElement('div'); listItem.classList.add( 'flex', 'items-center', 'justify-between', 'p-4', 'bg-gray-50', 'rounded-xl', 'shadow-sm', 'transition', 'duration-200', 'border-l-4' ); // 完了状態によってスタイルを変更 if (task.completed) { listItem.classList.add('border-green-500'); listItem.classList.remove('border-l-4'); // 完了時に左ボーダーを上書き } else { listItem.classList.add('border-indigo-400'); } // タスクのテキストとチェックボックスを含むコンテナ const textContainer = document.createElement('div'); textContainer.classList.add('flex', 'items-center', 'flex-grow', 'mr-4'); // チェックボックス const checkbox = document.createElement('input'); checkbox.type = 'checkbox'; checkbox.checked = task.completed; checkbox.classList.add( 'h-5', 'w-5', 'text-indigo-600', 'rounded', 'focus:ring-indigo-500', 'cursor-pointer', 'mr-3', 'flex-shrink-0' ); // チェックボックスの変更イベントリスナー checkbox.addEventListener('change', () => toggleTaskCompleted(index)); // タスクのテキスト const taskText = document.createElement('span'); taskText.textContent = task.text; taskText.classList.add( 'text-gray-800', 'break-words', 'w-full', 'leading-relaxed' ); // 完了状態のテキストに打ち消し線を適用 if (task.completed) { taskText.classList.add('line-through', 'text-gray-500', 'italic'); } else { taskText.classList.remove('line-through', 'text-gray-500', 'italic'); } textContainer.appendChild(checkbox); textContainer.appendChild(taskText); // 削除ボタン const deleteButton = document.createElement('button'); deleteButton.innerHTML = `<svg xmlns="http://www.w3.org/2000/svg" class="h-5 w-5 text-gray-400 hover:text-red-500 transition duration-150" viewBox="0 0 20 20" fill="currentColor"> <path fill-rule="evenodd" d="M9 2a1 1 0 00-.894.553L7.382 4H4a1 1 0 000 2v10a2 2 0 002 2h8a2 2 0 002-2V6a1 1 0 100-2h-3.382l-.724-1.447A1 1 0 0011 2H9zM7 8a1 1 0 012 0v6a1 1 0 11-2 0V8zm4 0a1 1 0 10-2 0v6a1 1 0 102 0V8z" clip-rule="evenodd" /> </svg>`; deleteButton.classList.add( 'flex-shrink-0', 'ml-3' // 削除ボタンがテキストから離れるように ); // 削除ボタンのクリックイベントリスナー deleteButton.addEventListener('click', () => deleteTask(index)); // 要素をlistItemに追加 listItem.appendChild(textContainer); listItem.appendChild(deleteButton); // リストコンテナに追加 todoList.appendChild(listItem); }); }; // 新しいタスクを追加する関数 const addTask = () => { const taskText = taskInput.value.trim(); if (taskText === "") { // 入力が空の場合は何もしない // alert()の代わりに、ここでは入力フィールドに一時的なスタイルで通知 taskInput.placeholder = "タスクを入力してください!"; taskInput.classList.add('border-red-500'); setTimeout(() => { taskInput.placeholder = "新しいタスクを入力..."; taskInput.classList.remove('border-red-500'); }, 1500); return; } // 新しいタスクオブジェクトを作成し、配列の最初に追加 tasks.unshift({ text: taskText, completed: false }); // 入力フィールドをクリア taskInput.value = ''; // タスクを保存して再レンダリング saveTasks(); }; // タスクの完了状態を切り替える関数 const toggleTaskCompleted = (index) => { tasks[index].completed = !tasks[index].completed; // 完了したタスクをリストの最後尾に移動させる if (tasks[index].completed) { const completedTask = tasks.splice(index, 1)[0]; // 削除しつつ取得 tasks.push(completedTask); // 最後に追加 } else { // 未完了に戻した場合、リストの先頭に戻す const incompleteTask = tasks.splice(index, 1)[0]; tasks.unshift(incompleteTask); } saveTasks(); // saveTasksがrenderTasksを呼び出す }; // タスクを削除する関数 const deleteTask = (index) => { tasks.splice(index, 1); // index番目のタスクを削除 saveTasks(); }; // イベントリスナーの設定 addTaskButton.addEventListener('click', addTask); // Enterキーが押されたときにもタスクを追加できるようにする taskInput.addEventListener('keypress', (e) => { if (e.key === 'Enter') { addTask(); } }); // アプリケーション起動時にタスクをロードして表示 renderTasks(); </script> </body> </html> |
この方法でも動作に問題はないのですが、Vanilla JSだと document.querySelector() や document.createElement() を多用した命令的なコードになります。
あとから「ちょっとUIの場所を変えたい」と思ったり、処理がおかしい場合に、AIでの修正がうまくいかず、自分で書き直したくなる時があるのですが、
そういった時、DOM操作が入り乱れていると処理の見通しが悪く、修正が大変です。
Vueが便利
そんな時に便利なのが、ビルドステップ不要のVue です。
Doc: https://ja.vuejs.org/guide/quick-start.html#using-vue-from-cdn
Vueは、コードのコンパイルをブラウザ側で行える「ランタイム同梱版」も配布しています。
CDNの https://cdn.jsdelivr.net/npm/vue@3.5.25/dist/vue.global.min.js などを読み込むようにすれば、下記のようにHTMLファイル内のDOM要素をVueのテンプレートとして処理可能です。
|
1 2 3 4 5 6 7 8 9 10 11 12 13 14 |
<script src="https://cdn.jsdelivr.net/npm/vue@3.4.25/dist/vue.global.min.js"></script> <div id="app"> <div><input type="text" v-model="myInput"> {{myInput}}</div> </div> <script> const {ref, createApp} = Vue; const App = { setup() { const myInput = ref('テキスト'); return {myInput: myInput}; } }; createApp(App).mount('#app'); </script> |
宣言的UIで描けたり、状態管理をリアクティブに行えたりするので、コードの意味を理解しやすく修正も容易です。そしてNode.jsやnpmを一切使わず作業可能です。
この「ビルドなし」という使い方は、React (JSX) や Svelte では難しいので、使い方によっては大きなメリットだと思います。
もし将来的にVue SFC(*.vueファイル)で作り直すとしても、コードの流れは同じような感じにできます。
Vueで書くと
先程のToDoリストを、Vueを使って書き直してもらったのがこちらです。
プロンプトhttps://cdn.jsdelivr.net/npm/vue@3.5.25/dist/vue.global.min.js でVue 3 Composition API を使って書き直して
コードを見る
|
1 2 3 4 5 6 7 8 9 10 11 12 13 14 15 16 17 18 19 20 21 22 23 24 25 26 27 28 29 30 31 32 33 34 35 36 37 38 39 40 41 42 43 44 45 46 47 48 49 50 51 52 53 54 55 56 57 58 59 60 61 62 63 64 65 66 67 68 69 70 71 72 73 74 75 76 77 78 79 80 81 82 83 84 85 86 87 88 89 90 91 92 93 94 95 96 97 98 99 100 101 102 103 104 105 106 107 108 109 110 111 112 113 114 115 116 117 118 119 120 121 122 123 124 125 126 127 128 129 130 131 132 133 134 135 136 137 138 139 140 141 142 143 144 145 146 147 148 149 150 151 152 153 154 155 156 157 158 159 160 161 162 163 164 165 166 167 168 169 170 171 172 173 174 175 176 177 178 179 180 181 182 183 184 185 186 187 188 189 190 191 192 193 194 195 196 197 198 199 |
<!DOCTYPE html> <html lang="ja"> <head> <meta charset="UTF-8"> <meta name="viewport" content="width=device-width, initial-scale=1.0"> <title>シンプルなToDoリスト (Vue 3)</title> <!-- Tailwind CSS CDNを読み込み --> <script src="https://cdn.tailwindcss.com"></script> <!-- Vue 3 CDN (Composition API対応) を読み込み --> <script src="https://cdn.jsdelivr.net/npm/vue@3.4.25/dist/vue.global.min.js"></script> <!-- Interフォントを使用 --> <link href="https://fonts.googleapis.com/css2?family=Inter:wght@400;600;700&display=swap" rel="stylesheet"> <style> /* デフォルトフォントとしてInterを設定 */ body { font-family: 'Inter', sans-serif; background-color: #f0f4f8; /* ライトブルーの背景 */ } .task-list-move, .task-list-enter-active, .task-list-leave-active { transition: all 0.3s ease; } .task-list-enter-from, .task-list-leave-to { opacity: 0; transform: translateY(-10px); } /* 削除される要素がレイアウトに影響を与えないようにする */ .task-list-leave-active { position: absolute; width: 100%; } </style> </head> <body class="min-h-screen p-4 sm:p-8 flex items-start justify-center"> <!-- メインコンテナ - Vueアプリをマウントする要素 --> <div id="app" class="w-full max-w-lg bg-white shadow-xl rounded-2xl p-6 sm:p-8"> <h1 class="text-3xl font-bold text-gray-800 mb-6 border-b-2 border-indigo-500 pb-2"> 今日やる事リスト (Vue 3) </h1> <!-- タスク追加フォーム --> <div class="flex space-x-3 mb-8"> <input type="text" v-model="newTaskText" @keyup.enter="addTask" placeholder="新しいタスクを入力..." class="flex-grow p-3 border-2" :class="{'border-red-500': inputError, 'border-gray-300': !inputError}" maxlength="100" @focus="inputError = false" aria-label="新しいタスクを入力"> <button @click="addTask" class="bg-indigo-600 hover:bg-indigo-700 text-white font-semibold py-3 px-4 rounded-lg shadow-md transition duration-150 ease-in-out transform hover:scale-[1.02] active:scale-[0.98]"> 追加 </button> </div> <!-- ToDoリストコンテナ --> <div class="space-y-3"> <!-- タスクのトランジションリスト --> <transition-group name="task-list" tag="div" class="space-y-3"> <div v-for="(task, index) in tasks" :key="task.id" class="flex items-center justify-between p-4 bg-gray-50 rounded-xl shadow-sm transition duration-200" :class="{ 'border-l-4 border-green-500': task.completed, 'border-l-4 border-indigo-400': !task.completed, 'opacity-70': task.completed }"> <!-- タスクのテキストとチェックボックスを含むコンテナ --> <div class="flex items-center flex-grow mr-4"> <!-- チェックボックス --> <input type="checkbox" v-model="task.completed" @change="toggleTaskCompleted(task.id)" class="h-5 w-5 text-indigo-600 rounded focus:ring-indigo-500 cursor-pointer mr-3 flex-shrink-0" :aria-checked="task.completed ? 'true' : 'false'"> <!-- タスクのテキスト --> <span class="text-gray-800 break-words w-full leading-relaxed" :class="{ 'line-through text-gray-500 italic': task.completed }"> {{ task.text }} </span> </div> <!-- 削除ボタン --> <button @click="deleteTask(task.id)" class="flex-shrink-0 ml-3 transition duration-150 p-1 rounded-full hover:bg-red-100" aria-label="タスクを削除"> <svg xmlns="http://www.w3.org/2000/svg" class="h-5 w-5 text-gray-400 hover:text-red-500" viewBox="0 0 20 20" fill="currentColor"> <path fill-rule="evenodd" d="M9 2a1 1 0 00-.894.553L7.382 4H4a1 1 0 000 2v10a2 2 0 002 2h8a2 2 0 002-2V6a1 1 0 100-2h-3.382l-.724-1.447A1 1 0 0011 2H9zM7 8a1 1 0 012 0v6a1 1 0 11-2 0V8zm4 0a1 1 0 10-2 0v6a1 1 0 102 0V8z" clip-rule="evenodd" /> </svg> </button> </div> </transition-group> <!-- タスクなしメッセージ --> <p v-if="tasks.length === 0" class="text-center text-gray-500 italic mt-6" id="emptyMessage"> タスクがありません。追加してください! </p> </div> </div> <script> const { ref, watch, computed, onMounted, createApp } = Vue; const App = { setup() { // リアクティブな状態 const tasks = ref([]); // ToDoリストの配列 const newTaskText = ref(''); // 新しいタスクの入力値 const inputError = ref(false); // 入力エラーの状態 // localStorageからタスクを読み込む const loadTasks = () => { const storedTasks = localStorage.getItem('todoTasks'); if (storedTasks) { tasks.value = JSON.parse(storedTasks); } }; // タスクをlocalStorageに保存し、タスクの順序を更新する const saveAndSortTasks = () => { // 1. 完了したタスクと未完了のタスクに分割 const incompleteTasks = tasks.value.filter(t => !t.completed); const completedTasks = tasks.value.filter(t => t.completed); // 2. 未完了のタスクを上に、完了したタスクを下に並べる // ID順などで並び替えても良いが、ここでは単純に未完了→完了の順にする tasks.value = [...incompleteTasks, ...completedTasks]; // 3. localStorageに保存 localStorage.setItem('todoTasks', JSON.stringify(tasks.value)); }; // タスク追加処理 const addTask = () => { const text = newTaskText.value.trim(); if (text === "") { // 入力が空の場合はエラー表示 inputError.value = true; // 1.5秒後にエラーを解除 setTimeout(() => inputError.value = false, 1500); return; } // 新しいタスクオブジェクトを作成 const newTask = { id: Date.now(), // 一意のIDとしてタイムスタンプを使用 text: text, completed: false }; // 配列の先頭に追加 tasks.value.unshift(newTask); // 入力フィールドをクリア newTaskText.value = ''; // 保存とソート saveAndSortTasks(); }; // タスクの完了状態を切り替える処理 const toggleTaskCompleted = (id) => { const task = tasks.value.find(t => t.id === id); if (task) { // Vueのリアクティブシステムが自動でtask.completedの変更を検知し、DOMを更新 // task.completed = !task.completed; // v-modelで自動的に処理されるため不要 saveAndSortTasks(); // 状態が変わったらソートと保存を行う } }; // タスク削除処理 const deleteTask = (id) => { tasks.value = tasks.value.filter(t => t.id !== id); saveAndSortTasks(); }; // アプリケーション起動時にタスクをロード onMounted(() => { loadTasks(); saveAndSortTasks(); // 初回ロード時にもソートして表示 }); // setup関数はテンプレートで使用するデータとメソッドを返す return { tasks, newTaskText, inputError, addTask, toggleTaskCompleted, deleteTask, }; } }; // Vueアプリケーションをマウント createApp(App).mount('#app'); </script> </body> </html> |
こちらの方が、構造がわかりやすいのではないでしょうか。
ケースバイケースでこの記事がお役に経てば幸いです。


